|
Spacebar…spacebar…spacebar…faster…spacebar.spacebar.spacebar! For those of you who went to elementary school in the 90s, perhaps you can reminisce with me about playing the good ole Oregon Trail computer game. I remember several things about the game – seeing the little covered wagon bump along the trail, “burying” those who died along the way, trying to feed my oxen, and trying to shoot squirrels and deer for food. I have this mental image (from the hunting part of the game) of the little man on the computer screen with his rifle with bullets emitting each time you pressed the space bar. The faster you pressed, the faster the bullets came. (Thus, my opening line for this blog post.) So, when you saw some squirrels or deer, you blasted a stream of bullets at them (remembering, of course, that your bullet supply was limited). I had a flashback to playing that game the other day when, lo, and behold, the Russell men brought me some game….  The pride on their young faces at bringing home some meat was too much. I cautiously mentioned that I had just seen a recipe for squirrel stew in my Mennonite Country-Style Recipes cookbook. That was the all the encouragement my dear husband needed to butcher the critter.
I smiled bravely as I carefully washed the squirrel. (Let me insert here that before this experience I had never eaten squirrel meat.) Thoughts ran through my mind, such as how I encourage other people to branch out and try new things like venison and goat milk; the old saying, “waste not, want not;” if I were really hungry, I would eat this, and how happy I was in the Oregon Trail game when my hunting yielded some squirrels. Hmm, could I practice all I preached and eat this creature? I read a few tips online and soaked the squirrel in a water, vinegar, and salt solution for a few hours. Then I poured it off and soaked it overnight in just salt and water. The next day, I simmered that little guy for about an hour to make it really tender. I deboned it, and it yielded about ¼ cup of meat that looked and smelled somewhat like dark chicken meat. I put it back in the fridge for about 2 days soaking in Worcestershire sauce. And, then….then…I made squirrel stew. I used a recipe from Mennonite Country-Style Recipes, but I adapted it so much that I’m not going to quote the original recipe. (I do want to give credit to the cookbook, and I highly recommend it because it is loaded with tips for from-scratch cooking. If you have the cookbook, the recipe I used is on page 511; it is called Brunswick Stew.) Russell Homestead Squirrel Stew 1 cup cooked and shredded squirrel and/or chicken meat 1 potato, diced ½ cup chopped onion 2-3 cups chicken broth 1 quart of canned tomatoes Salt, pepper, & seasoned salt to taste Directions: Put all ingredients in a kettle and cook until potatoes are tender. Notes: The canned tomatoes were my own. I can chunked tomatoes with peppers and onions. I did use chicken meat in addition to the squirrel meat because the squirrel was so small. We could not tell a difference between the chicken and the squirrel in the stew. (However, I will note that there was hardly any squirrel meat to speak of, so I won’t say that it tastes like chicken! It simply pretty much hid in our stew.) Other options: The Brunswick stew recipes also called for bacon, lima beans, cayenne pepper, and corn. The options are endless, provided you have squirrel meat available. The conclusion of all this – it was worth it! My boys felt like men who provided meat for the table. The stew was quite tasty, and everyone enjoyed it. I will definitely use this recipe again if any other unfortunate squirrels meet my Russell men. And, since I'm an animal lover who could never bring herself to shoot any animal, I feel good when a harvested animal does not go to waste. If anyone reading this has any tips on cooking squirrel, I would love to hear them! Thanks for stopping by! Recipe Disclaimer
1 Comment
If you know me or you’ve spent time perusing my blog, you know I’m all about axing things from my grocery list. I have several reasons for slimming down my grocery list – I like to save money, provide a healthier alternatives for my family, and become more self-sufficient. This recipe is one of my tried & trues that I use nearly every week that fulfills all these reasons.
So, what item does this recipe knock from my grocery list? The main cream soups used in cooking – cream of mushroom, cream of chicken, and cream of celery. Here’s the recipe, and then I’ll provide some tips for using it. Easy Cream Soup Substitute 2 Tablespoons of Butter 2 Tablespoons of Flour 1 cup of milk Melt the butter in a kettle. Whisk in the flour before the butter browns. Slowly add the milk. Stir frequently until it thickens (about 5 minutes). The product is a white sauce that is equivalent to a can of 10 ¾ ounce of cream soup. If you are substituting for cream of mushroom, I simply use this recipe. If you are substituting for cream of chicken, I do ½ cup of milk and ½ cup of chicken broth OR simply add 1-2 teaspoons of chicken base. If you are substituting for cream of celery soup, sprinkle ½-1 teaspoon of celery salt. This substitute works well for casseroles. It would not work very well to simply eat as a soup. If the casserole only has a few ingredients without a lot of spices, you may need to spice it up when using this substitute recipe. I use spices such as salt, pepper, garlic salt, garlic powder, or seasoned salt. In many recipes, I just use this recipe, and it turns out delicious. This recipe is fabulous for anyone who has excess goat milk (as we often do). It is also great for anyone looking to limit their sodium intake. Cream soups in the store are PACKED with salt; with this recipe you can control the amount. I usually don’t add any salt, unless (as I noted above) the casserole lacks spices to begin with. Happy cooking, and thanks for stopping by! You're gonna need them if you're a mom. And you're probably gonna need them everyday. And you might even need them if you're a Grandma. Baby wipes. As a new mom, I bought my baby wipes. I had no issues with any certain brands, but I'm always looking to cut things out of my grocery list. So, as my usage of baby wipes grew with my family, I decided to ax them from grocery list by making my own. (Granted, now the supplies to make them are part of my list, but at a greatly reduced cost than store bought baby wipes.) After googling, "Homemade Baby Wipes," I found a recipe that sounded reasonable, tried it, and was basically satisfied with the results. However, they were a bit too soapy for my liking, so I watered down the recipe. I also greatly reduced the "soaking" time because it didn't seem necessary to soak paper towels for 10 minutes a side in a solution that they suck up in 30 seconds. Here is the basic recipe: 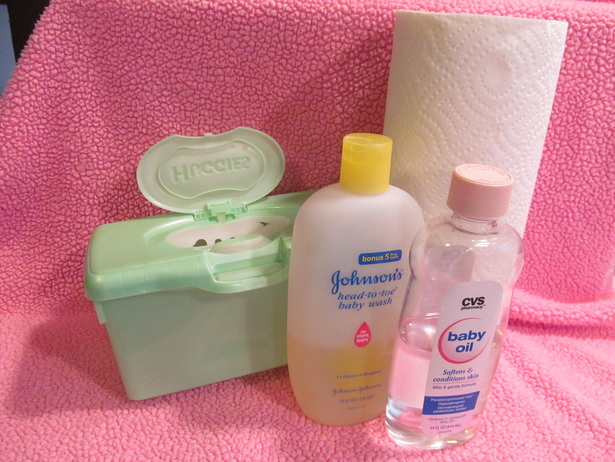 Ingredients: Paper towels Baby wash Baby oil Water Container to put your baby wipes in Procedure: 1. Carefully cut your roll of paper towels into thirds. This is the most difficult part. Once this is done, the work is almost over! 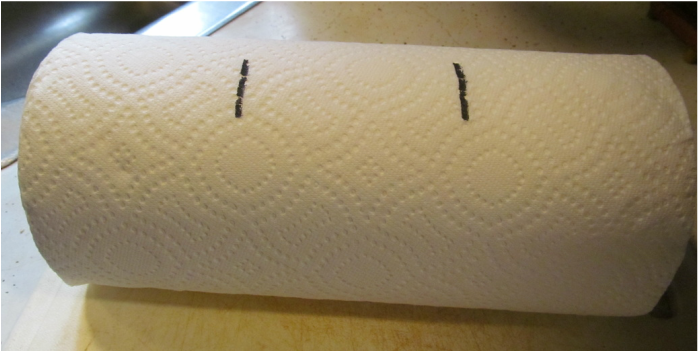 Remove the cardboard tube after it is cut into thirds. 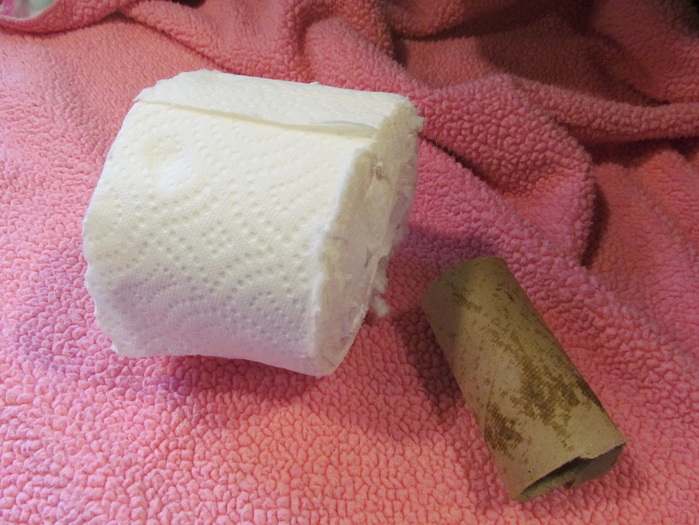 2. Pour 1/2 cup of cool water, 1 teaspoon of baby oil, and 1 teaspoon of baby wash into your wipes container. (I use the container baby wipes come in from the store. I have three of them that I fill at one time with this recipe.) 3. Stir these three ingredients gently. Try to avoid having a lot of suds from the baby wash. 4. Set one of your thirds of your paper towel roll into the container for about 30 seconds. Remove it, and set it dry side down on a counter. 5. Repeat steps #2 and #3. 6. Set the half-wet roll back into the solution (dry side down). 7. Close the lid of the baby wipes container. Pull the paper towels from the CENTER of the roll up through the hole in the wipes container. They should pull out nicely this way. 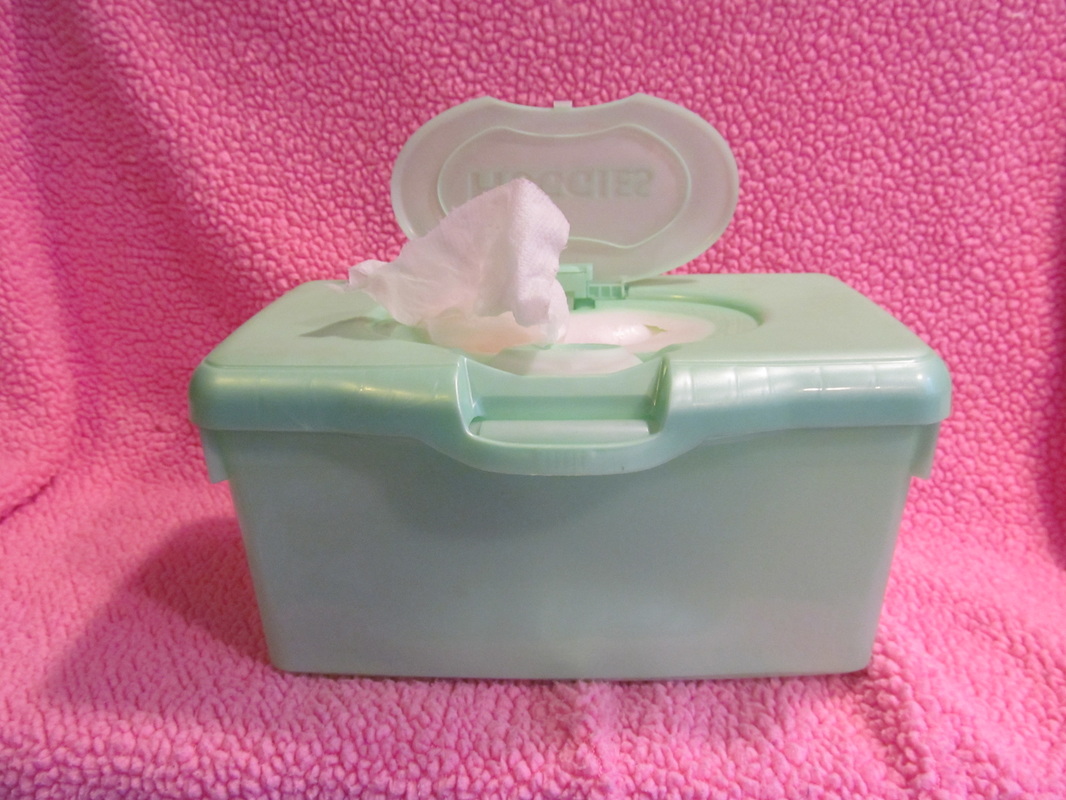 Some tips....
-Use quality paper towels. My personal favorite is Brawny, but I've used Bounty as well with this recipe. -Paper towel rolls come in various "thicknesses." Adjust the amount of water/baby oil/baby wash solution accordingly. -Make these and use them within a month (never an issue around here to get them used up!). One time I tried to stock up on these before one of my babies was born. I made several containers about 3-4 months before the baby was born. I was disappointed to find that they developed mold by the time little one arrived. So, make them, and use them. I've never had any mold issues other than that instance. Recipe Disclaimer |
AuthorVanessa from Russell Homestead. Follower of the Lord Jesus, wife of my knight in shining armor, mother of 5 wonderful children, and joint-keeper of the Russell homestead. Thanks for stopping by! Archives
March 2023
Categories
All
Vanessa Russell
Independent Field Representative ID#20249934. |
 RSS Feed